
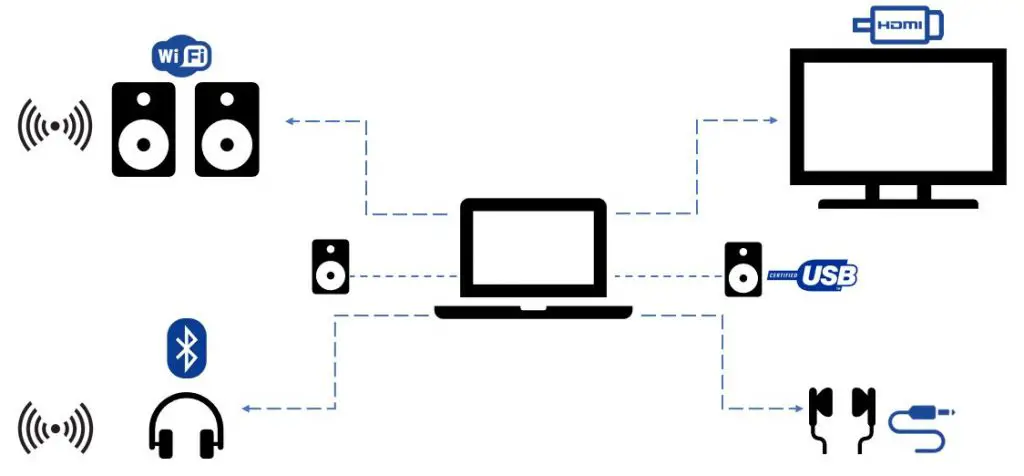
How to Connect Laptop to Surround Sound System?
Laptops are, no doubt, a wonderful device for watching movies, listening to songs, playing games and doing your work in a relatively short time. But, no matter how much good of a laptop is, its speakers aren’t loud enough. Especially when you are watching a movie with a large number of friends or it’s family night.
In this article, our editors have explained the best ways to connect your laptop with a surround sound system. If you really want to enjoy and have a full movie night, it is best to connect your laptop to your stereo.
It will not only make you enjoy your movie, games or your favorite song with loud audio but also it will provide flexibility, both in terms of quality and volume of the sound. But how you will connect to the nearby audio system will depend upon the available connections.
Contents
- 1 How to Connect Laptop to Surround Sound System?
- 2 Connect a laptop to surround sound system via HDMI
- 3 Using RCA Cable to connect with a surround sound system
- 4 Toslink/ SPIDF Cable to connect a laptop to sound system
- 5 connecting the laptop with a Standard audio system
- 6 Configuring surround sound in Windows
How to Connect Laptop to Surround Sound System?
There is a number of ways, which are really easy to understand and hence, follow. Plus, these are really popular methods, mostly followed by people.
So, I have written it down for you guys, in detail and as much as in easy language I could. Try to follow it stepwise and it will be easy to comprehend. And, then, finally, enjoy a happy movie.
Connect a laptop to surround sound system via HDMI
For the first step, connect the one end of the HDMI cable to the HDMI’ port of your laptop. HDMI is best known for supporting the high quality of digital audio and video connections.
So, it is really ideal for the users, who have the HDMI port, both on their laptop as well as the stereo system. It makes the process really easy and faster, just by connecting a wire.
Next, connect the other end of the cable of HDMI to the “HDMI IN” port of your stereo system or any of the surrounding sound receiver. Now, use the Input Setting’s Control of the stereo system to set the device as the HDMI. Then, on your Windows taskbar, right click on the option of the HDMI Output. And, choose the option of the “Playback Devices”.
Actually, this is the area of the window which allows you to make any changes to your laptop’s output audio. Now, right click again on the HDMI output option and choose the option; Select As Default Device.
The exact name of the option will actually depend upon the type of the computer’ drivers and the hardware components, you are using. Personally, I like to connect my laptop with a surround sound system with an HDMI cable and that works just perfect.
Click here to buy HDMI cable from Amazon.
For instance, in the case of NVIDIA users, you will see NVIDIA HDMI Output. So, don’t fret over it and look at the main options, instead of worrying over the same wording. As I have said before, it varies according to the drivers and hardware components. Moving on to the next step, now you can start your music or media, what you want to play at the moment.
If what you have chosen, on your stereo, is the right input channel and on your laptop, is the right output option. Then, you will soon hear your music through your stereo. And, now its time for you to enjoy your music or movie night, as you have planned with clear and loud audio.
This is the simplest and if I may say, the easiest method to connect your laptop to the surrounding stereo system.
Using RCA Cable to connect with a surround sound system
Another method is via RCA. To follow this method, first of all, connect your end of the headphones to the RCA cable and to the headphone jack of your laptop. Your laptop will automatically change the option to the output mode to account for the headphones’ connection.
Next, the red and the white plug at the end of the cable, connect them to the stereo audio, in the ports. Make sure that the color of the plug and the port matches, as the red plug will go in the red port and white plug will go in the white port. So, the audio will come from the right direction in stereo mixes.
Click here to buy RCA Cable from Amazon.
Now, set the stereo sound system to the appropriate level of the audio channel. The input channel will be corresponding to the identifier label by the input ports. In case you don’t hear the audio, then right click on the icon of the volume in the Windows Taskbar. Then, select the option of the Playback Devices and then set your headphones, finally, to default.
Toslink/ SPIDF Cable to connect a laptop to sound system
Other than RCA cable, which is the most commonly used cable for connecting to the surrounding system. Another method or cable used is the SDF cable. The procedure is actually really simple. Just make sure no wire or cable is attached to your laptop, before following the further steps. It is best to take precaution before than to regret it later, so be extra careful.
First of all, make sure that the volume is turned down on to your laptop and then make sure the same is the case for your surround sound system. And, other than the volume, your sound system should also be turned off, before connecting the wire. Now, after making sure, you can plug one end of the cable to the port of your laptop. and, the other end of the Toslink cable to your sound system.
Now make the minor changes to your sound settings in the laptop and change the default audio device in the Windows settings. To configure your system, go to your Control Panel and select Sound and click on the Playback tab. Then, you have to right click on the optical output, also known as the SPDIF and finally, select the option, Default.
In XP, the settings are really similar to the above steps. All you have to do is start a song on your laptop and turn your sound system ON. And, then make sure that the sound system is playing the right channel or change it, according to your preference. Then, you can adjust the sound level on both the laptop and the sound system and have fun with your movie!
connecting the laptop with a Standard audio system
While connecting to any of the standard audio systems, go through the following steps. Firstly, reposition your laptop in a way that the connection panel, at the back of your laptop, can be accessed easily. It is up to you whether you want to off your laptop or not, but I would say turn it off, in the case the power cord, you have is not long enough.
Turn it off and unplug, if you deem it necessary. Then, try to locate the audio connections for your surrounding sound system, it could be RCA ( as mentioned above) or optical. Then, the connections will be labeled. Now, plug the cord or the cords, depending upon the type of optical you are using though it is one in case of optical and two to three in case of RCA.
Connect these cords to the ports of your laptop, which are at the back of the laptop. then, move your laptop to its original position and now you can turn it back on if you want. Now, make sure that your surrounding sound systems are at the positions, you want them at or move them to your desired location and then, finally, plug in the power cord of the system.
Configuring surround sound in Windows
Another fastest way of connecting to the surround sound system is through the configuring surround sound in Windows. In this method, all you have to do is simply open the Start Menu on your laptop. And, then click on the Control Panel. After that in the search box, type “Sound” and in the results, click on the option of the “Sound.”
And, then open the “Playback” tab in the dialogue box. Then, click on your surround Sound Speaker Icon, as you recognize. And, click on the option of the Configure button. And then select the 5.1 Surround, as your speaker type option. And, to send the test tones to each of your speakers, click on the button of the “Test” and then click the option; Next.
Then you will simply have to follow the commands coming on to your screen, and they will be guiding you in merely two to three steps or clicks in completing the configuration of your surrounding audio system.
This method is actually the fastest and for you, if you don’t like connecting wires or forget which wire to connect in which port. All you have to do is follow simple options on the screen and you can enjoy!
Thank You
Team – Whatlaptops.com
Related Articles: